Indigenous Studies
Section 6: The Indigenous Archaeology of Australia
Rock art in the form of pictographs and petroglyphs give many tantalising glimpses of the societies and cultures that lived across Australia over the last 60 000 years. Much of what all Australians now know would not have been possible to interpret without the input of Indigenous Australians who have shared their traditions, beliefs and stories passed down through oral storytelling.
Unfortunately, there is much more that has been lost as the keepers of the knowledge have died out since the influx of people from other continents in the last 200 years. That’s where archaeologists can help. To quote the Australian Museum, “The long history of Indigenous Australians is documented in numerous archaeological sites throughout Australia. Archaeological sites are localities where the material evidence of past human activity is preserved. They include camping sites, quarries and ceremonial sites. The evidence, in the form of artefacts, remnants of various craftworks, bones of consumed animals, rock art and ceremonial arrangements, carved trees and fireplaces, can be found on the land surface or beneath in stratified positions.” See more at: http://australianmuseum.net.au/The-Aboriginal-Archaeological-Collection
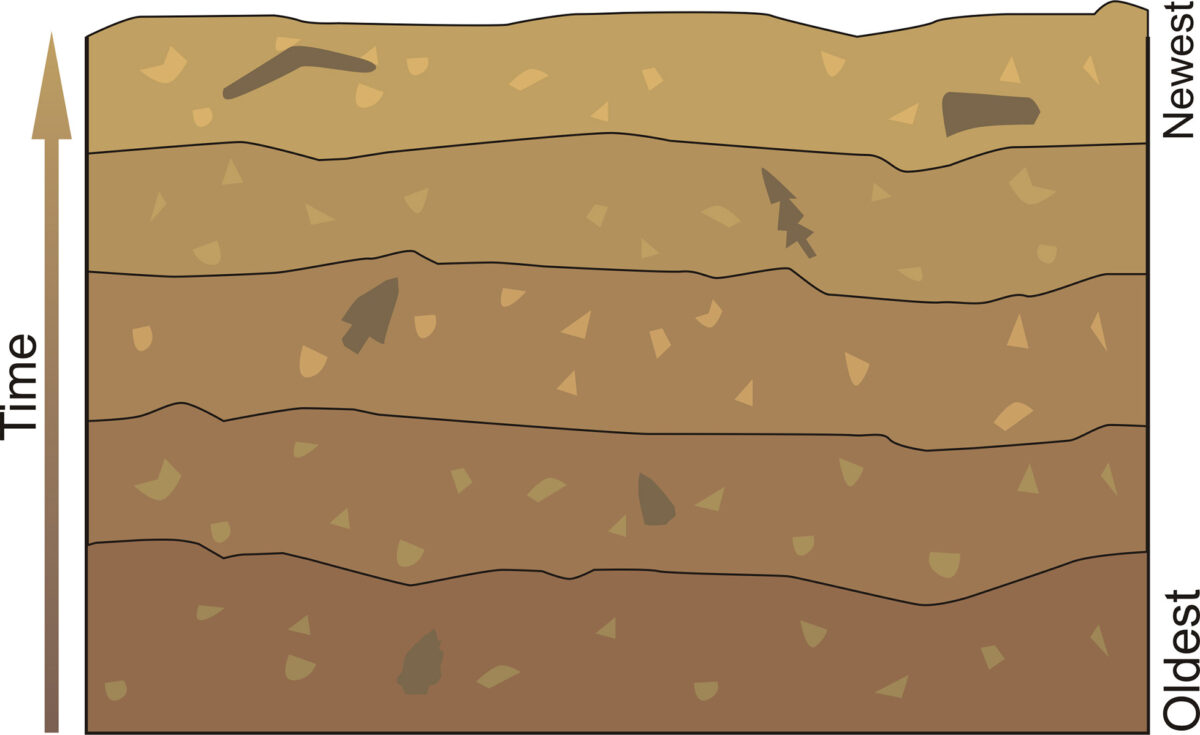
Stratified positions are layers of soil or earth. Each layer is called a stratum, and the oldest layer is at the bottom.
Activity 6.1 – Internet research
Your task is to: Find a map of Australia that includes some town and city names. Copy and/or paste this map on to a separate sheet of paper.
Find the nearest site to where you live and prepare a summarised report about the investigations into Indigenous archaeology near you. Can any local Indigenous people help you to understand what is being found there?
Carved Trees – A Lost Art
The custom of carving trees was a culture practised by Indigenous people of parts of NSW. Trees treated in this way have been called dendroglyphs.
![Burial Trees] [IMAGE: art_27.jpg |Burial Trees] [IMAGE: art_28.jpg |Burial Trees](https://learning-hub.com.au/wp-content/uploads/2026/03/art_26.jpg)
Caption: These burial trees were originally photographed in the late 1930s. Their survival to this day is unknown.
For thousands of years, Aboriginal groups in central and western NSW marked important ritual sites by carving beautiful, ornate designs on the trunks of trees. These areas of NSW were once dotted with sacred, carved trees, particularly regions such as Gamilaroi country (an area that stretches from the Upper Hunter Valley west to the Warrumbungle Mountains and north into south-west Queensland) and Wiradjuri country (a region bordered by the Lachlan, Macquarie and Murrumbidgee rivers). In these areas carvings marked the burial sites of important men and served as powerful initiation symbols for boys making their transition to manhood.
Near Molong, NSW is the grave of Yuranigh, a Wiradjuri man. He was the guide to Major Mitchell and, on more than one occasion saved the Major’s life. Yuranigh’s life was honoured by both Indigenous and European Australians. Four trees were carved in the 1850s and still surround his burial site. A gravestone was also erected in his honour. This inscription states that he was buried according to the rites of his countrymen and that the spot was “Dedicated and Enclosed by the Governor-General’s authority”. As a result, the gravesite contains a unique combination of Aboriginal and European burial customs that is not known of anywhere else in Australia. Sadly, this is a rare exception. In most other cases the plight of the carved trees is tightly bound to the dispossession of Aboriginal peoples after European colonisation.
Those trees used at Bora grounds, where all kinds of ceremonies were carried out, were often decorated with markings of snakes, lace lizards, human forms, emus and other kinds of figures. The carvings, comprising symbolic motifs, intricate swirls, circles and zigzags, were intended to be long-lasting but, instead, only a handful of the trees on which they were carved are still alive today.
Most of approximately 7500 sacred tree sites recorded in NSW have been destroyed by land clearing, bush fires, farming and natural decay.
The last recorded ceremonies took place at least 100 years ago, around the time that Aboriginal people were moved into reserves and were rewarded for practising European ways and encouraged to accept European-style funerals and tombstones instead of trees. Today, Collymongle in north-west NSW is the site of around 60 surviving carved trees, the greatest cluster remaining in the state.
Activity 6.2 – Bringing Home Indigenous Relics
The two tasks below are going to involve Internet research and some serious discussion between members of your group. Your group can prepare your answer as an oral presentation with a visual aid such as a PowerPoint to assist OR you can prepare a discussion essay by combining the two parts of the question.
During the 1930s and ’40s many anthropologists campaigned to save the remaining carved trees by collecting them and sending them to museums. Now some communities are trying to get them back. For example, recently Museum Victoria returned a secret, sacred carved tree to the Baradine community in north-west NSW that had been removed 90 years earlier. The tree was carved in 1876 to mark the burial site of five Gamilaroi men.
It has been said that much of the meaning of the sacred tree carvings is lost or secret so that non-Indigenous Australians have very little or no understanding of their importance to Indigenous people. How can this lack of understanding be eliminated? Why do you think Indigenous communities are trying to get their sacred trees returned?
This paper was written in 1940 http://www.newcastle.edu.au/Resources/Divisions/Academic/Library/Cultural%20Collections/pdf/mccarthyjune1940.pdf In its last paragraph states “It is incumbent upon every citizen of the State to do his utmost to preserve the dendroglyphs in his district, and it is especially important that pastoralists and farmers make every effort to protect carved trees on their property. If a dendroglyph cannot be left standing, then it should be cut out of the tree and sent to the Australian Museum.” This type of advice was common in the middle of last century. Would the same advice be given to farmers and pastoralists today? Explain your answer.
Bark Painting
Bark painting involves painting on the inside of a strip of tree bark. Because bark decomposes fairly quickly, there are no ancient records of bark painting. However, because it is a continuing form of artistic expression in Arnhem Land and other regions of Australia, it may well be a very old art form. Certainly, the designs produced are traditional and reflect those seen on rock paintings which are known to be very old. Traditionally, bark paintings were produced for instructional and ceremonial purposes and were short-lived objects. Nowadays they are highly prized across the world.
Creating a bark painting
A new painting begins with the collection of the bark. In Arnhem Land, the bark comes from one type of eucalyptus tree, the stringy-bark, Eucalyptus tetrodonta.
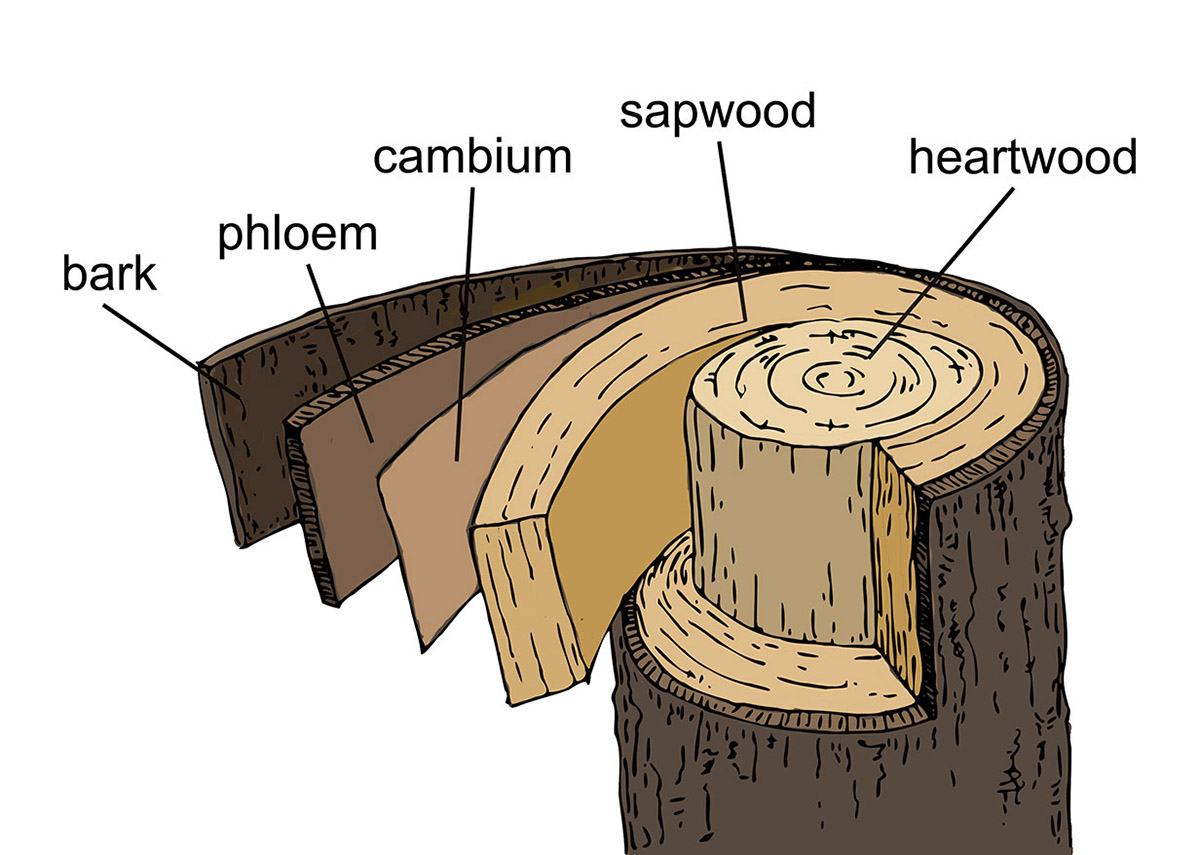
Choosing the right bark is important. The bark must be free of knots and other blemishes such as termite damage. It is best cut from the tree in the wet season when the sap is rising. When an artist finds a tree that satisfies all his requirements, the trunk is ringed about three feet from the ground. Climbing up the tree, another ring is cut into the bark about 1-2m above the lower cut. Then a vertical strip is cut to joining the two rings and a big sheet of bark is slowly peeled away an immense sheet, leaving the trunk of the tree naked white and running with sap.
Back at camp, the outer fibrous layers of the bark are carefully trimmed off. The bark that is left tends to curl so it is thrown on a fire with the inner side downwards. The heat is not enough to burn the bark, but enough to turn some of its sap into steam and make the whole piece pliable. After a few minutes, the bark is flattened under foot and weighed down with stones or logs to dry absolutely flat.
Indigenous artists traditionally use four pigments: red, yellow, white and black. The ochres are in red and yellow. White kaolin or pipeclay is dug from pits and black is produced by grinding up charcoal. There is ample evidence that Indigenous artists also traded ochres. For example, in Quest under Capricorn 1963 page 75, David Attenborough wrote the following: “… he had another ochre which was a richer deeper red. This was not of local origin but came from somewhere to the south and was traded from the people in whose tribal territory it occurred. Accordingly, it was very precious and Magani kept it in his dilly bag, carefully wrapped up in a packet of paper bark.”
Traditionally, the juice of fleshy stems of the Dendrobium orchid is used as a fixative to prevent the paint from flaking. Nowadays, the pigments may be fixed with a binder such as PVA glue.
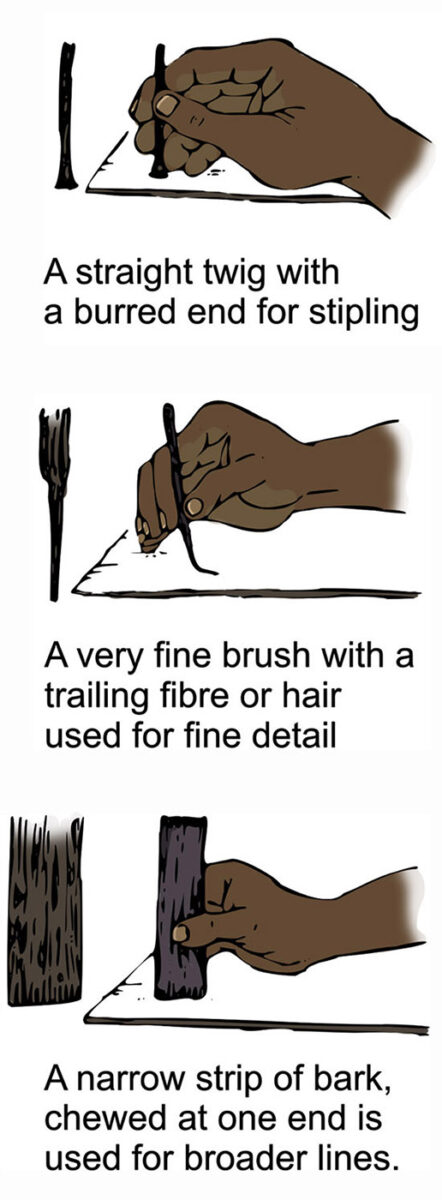
Once the sheet of bark is dried, painting can begin. Traditionally, each figure is roughly outlined with the orchid stem, which has been chewed at the end to make it juicy. For the detailed painting, traditional artists used three different brushes – a twig with a chewed splayed end which produced broad lines, another with a burred end which was used for stippling, and a third with a trailing fibre attached to the tip which made thin delicate lines.
Activity 6.3 – The bark painting process – an investigation.
The aim of this investigation is to determine the potential of bark from trees, other than that from the Darwin Stringybark, Eucalyptus tetrodonta, to produce bark paintings. Your task is to design and carry out a procedure that can test the quality of a treated bark and its potential for use as a background for a bark painting
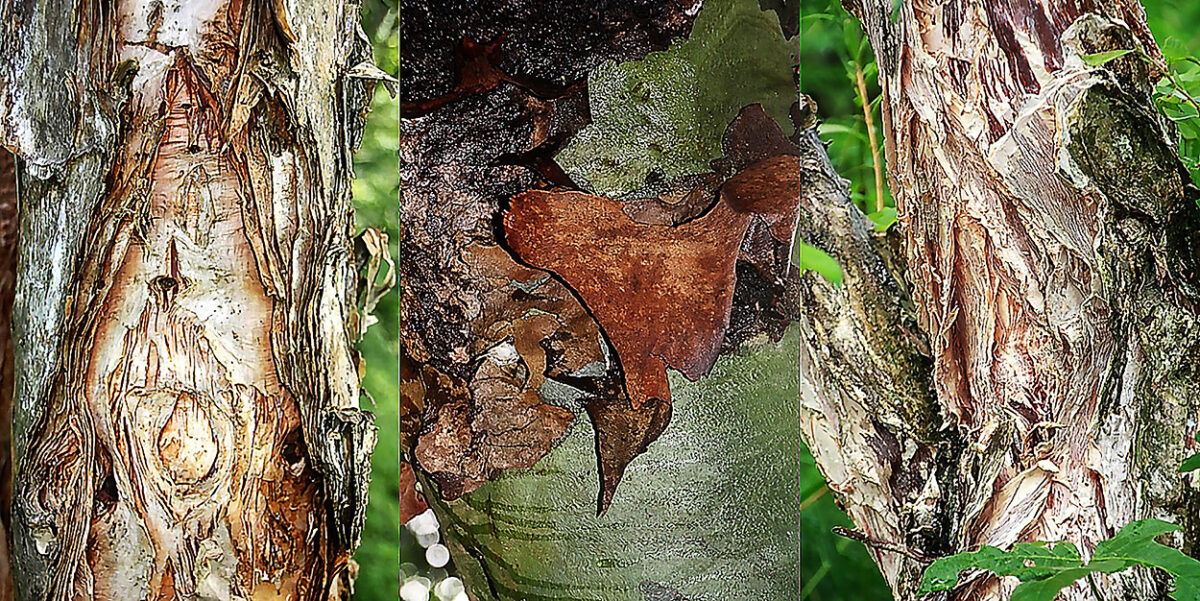
Many trees, such as those above, have bark that peels off easily without damaging the tree. Some Indigenous (and other) people, in recent times, have used the different colours and tones of such barks to make pictures out of the bark. Sometimes, these bark pictures are then enhanced with some paint pigments. If you type “pictures made from tree bark” into your favourite Internet search engine, you will find some examples and even instructions on how to make a picture. Can you collect a variety of bark colours without damaging the trees involved? Perhaps you would like to try to make a bark picture?
Preparing and making a bark-based painting – the steps
Planning stage:
You need to do some research on places where there are trees with falling bark. Do you have a park nearby? Do you know where there is a tree that sheds its bark? Remember:
you need to get permission to use bark from the owners of the tree.
you need to make sure that any removal of bark does not damage the tree.
you need a piece of bark that is about 20cm square for your tests. There is no need to take a very large piece of bark off a tree.
Once you have found a suitable piece of bark, don’t forget to find out the name of the tree OR take a photo of the tree so it can be identified.
Read through the description of how a bark painting was created again. How can you recreate this process in a laboratory, your kitchen at home or in the art classroom?
With your group, write down a list of the equipment and materials you will need.
Discuss with your group the steps that you will need to take. Once you agree, write these steps down as your procedure for the investigation.
It is most important that you also identify any risks in the procedure you intend to follow and list the precautions you need to take. Remember: Safety for yourself and others is top priority.
Have your adult supervisor check your planned procedure and make any adjustments suggested.
In your group, you will need to decide what properties are important to consider in a bark that is going to be used for a painting. Examine your bark sample carefully and note down its properties BEFORE it is treated.
Procedural stage:
Collect all the equipment and materials you need BEFORE you start.
Double check your designed procedure so that you know what you have to do in each step.
Carry out your procedure, making sure that all safety precautions are in place.
Note down any observations you have made during the process including any suggestions for improvements.
Analysis of product:
In this step, you write down all of your observations on your finished product. How has the bark responded to treatment? What does it look like now? What are its properties now? Are you satisfied with the result?
Evaluation stage:
At this point, you have two important and different categories of criteria to consider.
How will you evaluate the quality of the bark that you have processed? Think about the purpose of the bark. For example, does it need to be hard, strong, brittle or flexible? Does it need to be waterproof? In your group, you can decide on a set of conditions/criteria that will allow you to judge the quality of your treated bark.
How will you evaluate the effectiveness of the procedure you used to treat a piece of bark? Think about the efficiency of your procedure. Did it run smoothly? Were there problems? If so, what were they? How could you improve your procedure?
Where to next? Is your bark good enough to be painted? Do you want to try and treat another bark?
Fibre crafts
Rare archaeological finds together with historical accounts, as well as current practice, show that Indigenous Australians have always been skilled at spinning and weaving.
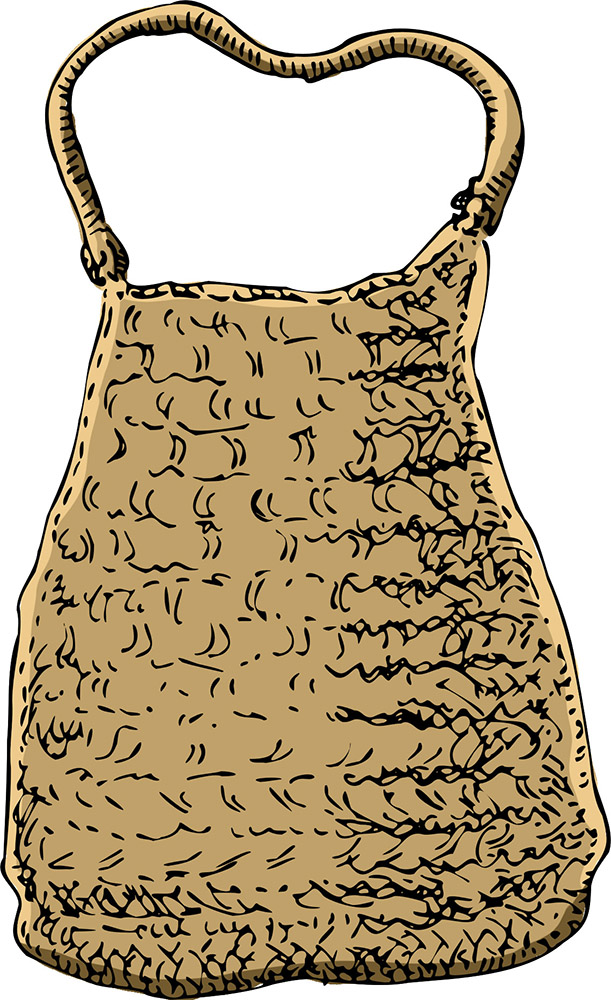
Materials used depended on where the people lived in Australia. In areas where the right kinds of bark or leaves were plentiful, plant fibres were used to make strong thread. In the north, the more tightly woven styles were made into fish and animal nets, fishing lines, bags and sometimes baskets and mats. Some of them were so closely twined that they could hold honey.
Bags and baskets were often decorated if they were used for religious ceremonies. Sometimes fibres were coloured with natural plant dyes before they were woven into a basket. Alternately, patterns were painted on to the finished product. The finest baskets were those of the men of Arnhem Land which were painted with totemic designs and decorated with parrot feathers.
Pandanus and sand-palm are still used in areas such as the Daly River region and Arnhem Land to weave carry baskets, dilly string bags, wall hangings, floor mats and fishnets. The women of Peppimenarti and Oenpelli are famous for such weaving. For example, the art of the women of Peppimenarti is set apart from other regions by their use of materials (sand-palm and pandanus), processes (all-natural dyes derived from berries, roots and ash) and techniques (knotless netting and coil).
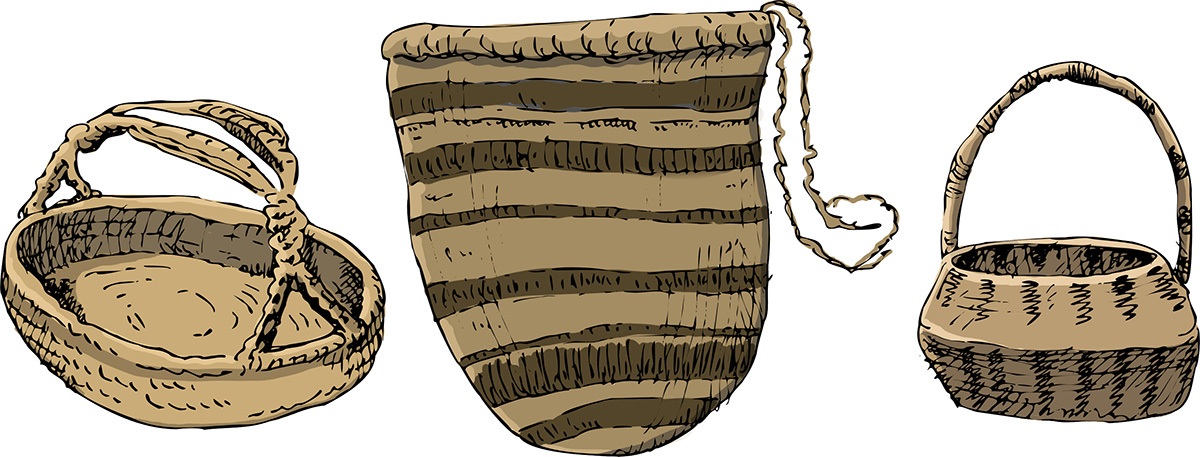
There are several different ways of looping and knotting the twine, but the people of southern Australia had fewer methods than northern people. In the south, a looser stringed bag or dilly bag was made.
In Central Australia, the people spun human hair and animal fur into belts, headbands and ritual items. For example, Anangu women have always made several items from fibres; hair belts, head bands, shoes from bark and feathers, and hair string skirts or face coverings for modesty and ceremonial purposes. Grass weaving was not a traditional pursuit but nowadays, basket weaving is still spreading further and further across the desert with different regions developing their own unique styles. The Tjanpi Desert Weavers, which represents 400 women from 28 communities in South Australia, the Northern Territory and Western Australia, are famous for their imaginative and beautiful works.
Activity 6.4 – Natural dyes from your own back yard
Eucalyptus dye: Indigenous people would have access to plants that grew naturally in Australia. For example, eucalyptus leaves produce an “earthy colour”.
You’ll need:
Large Bundle of eucalyptus leaves
Stainless steel pot for heating
Water
Heat source
Something to dye such as a piece of white cloth or fibre.
Method:
Fill the pot with eucalyptus leaves and add water until the leaves are covered.
Bring the mixture to the boil and simmer for about an hour. Safely remove from heat.
Carefully remove all leaves and add the cloth or fibre to be dyed.
Heat for about 15 minutes and allow to cool.
Remove your cloth or fibre. What colour is it?
Further questions to investigate:
Does eucalyptus bark produce a different colour?
Do different eucalypts produce different colours? Have a look at this page http://anpsa.org.au/APOL8/dec97-6.html
What other colours can you get from native plants?
How do you stop the colours running out when the fabric is washed?
Assessment
Download the assessment for this section.
Online assessment will be added in a future version.
Progress
Section not yet completed.